CodeRabbitがClaude Marketplaceに登場!Learn more

Aleks Volochnev
February 10, 2026
8 min read
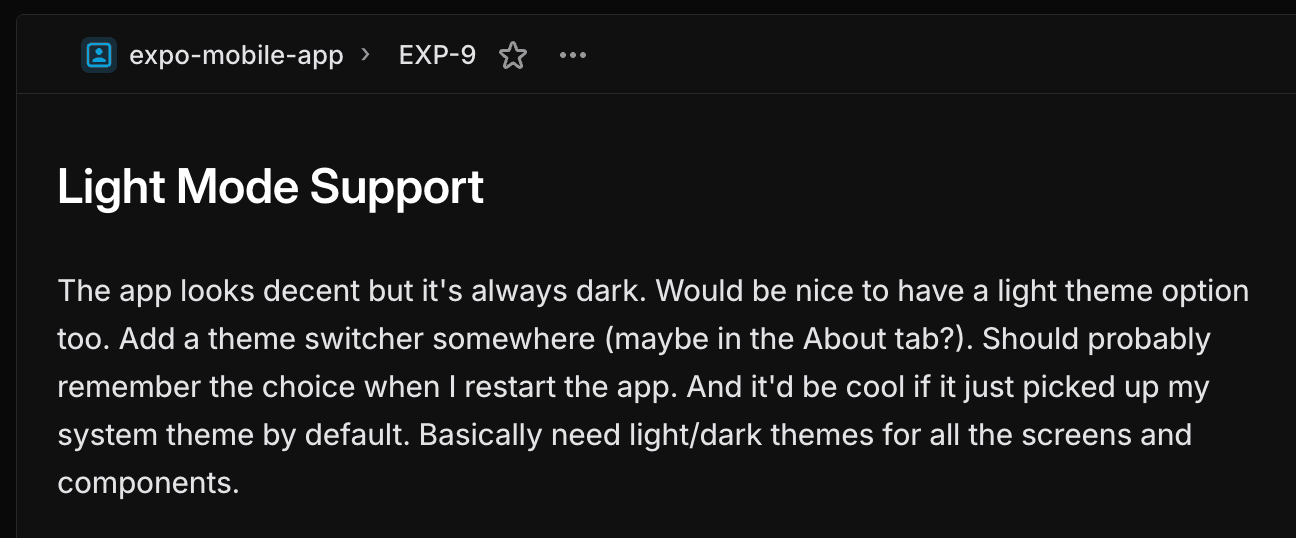
There's a gap between a ticket and meaningful code. Your ticket says, "Add dark mode support." Great, but what does that actually mean in code? Which files need changes? What patterns does the codebase already use for theming, and are there shared utilities you should extend?
Tickets describe the what. Someone still has to figure out the how, by diving into the codebase and tracing dependencies. That's the slow, unglamorous work that makes or breaks the implementation. You can't skip it, unless you enjoy rewriting things three times.
"Ask your coding agent to plan it?" Sure, Claude or Cursor will happily generate one in ten seconds flat. It looked at a dozen files max and definitely didn't notice that related issue your teammate closed three weeks ago (while you were on vacation), the one where the team decided on a specific state management approach for exactly this kind of thing.
These fast plans can be confidently wrong in ways you won't discover until you're deep in implementation or even review. And even if it were solid, it lives in your agent's context window, your colleague who knows the settings screen is about to be refactored never gets to weigh in.
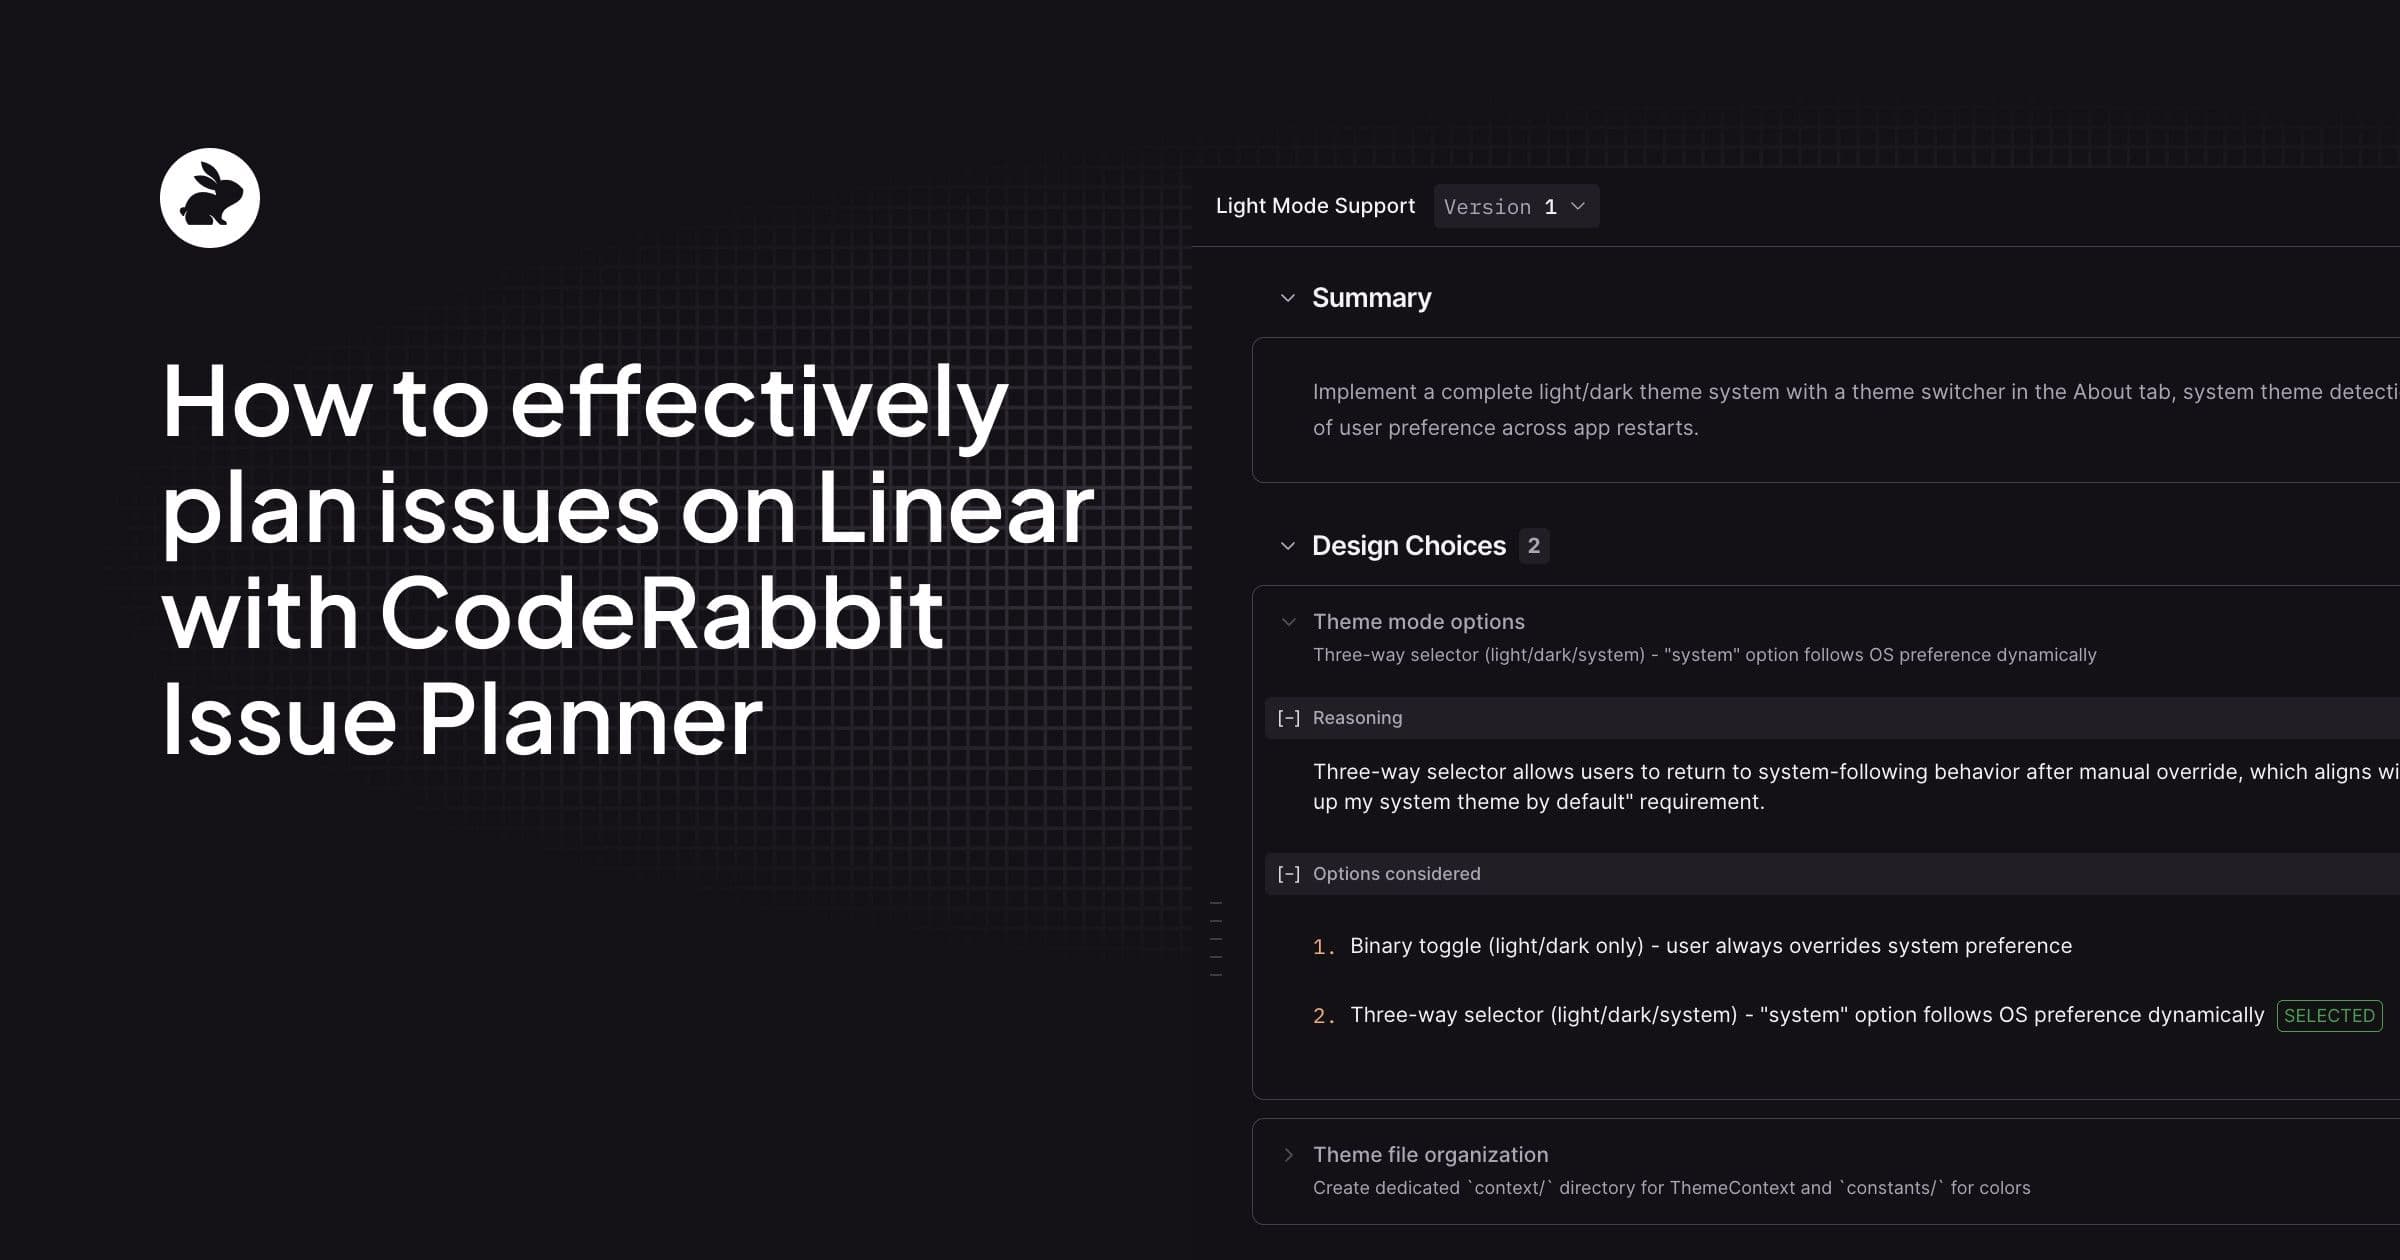
That’s where CodeRabbit Issue Planner comes in. It reads the issue, goes through relevant related issues for context, and combines that with its deep, continuously-built knowledge of your codebase: the source code dependency graph, established patterns, and previous architectural decisions. Out comes a Coding Plan: research results, design choices with rationale, phased tasks, and detailed agent-ready prompts you can hand off to whatever agent you use.
Gathering the right context takes time, but I'd rather have a great plan in a few minutes than a confidently wrong one in a few seconds.
There is a special place in hell for people who write tickets like that, right?
The simplest way to get a plan is to comment @coderabbitai plan on an issue. A few minutes later, CodeRabbit replies with a link to your Coding Plan.
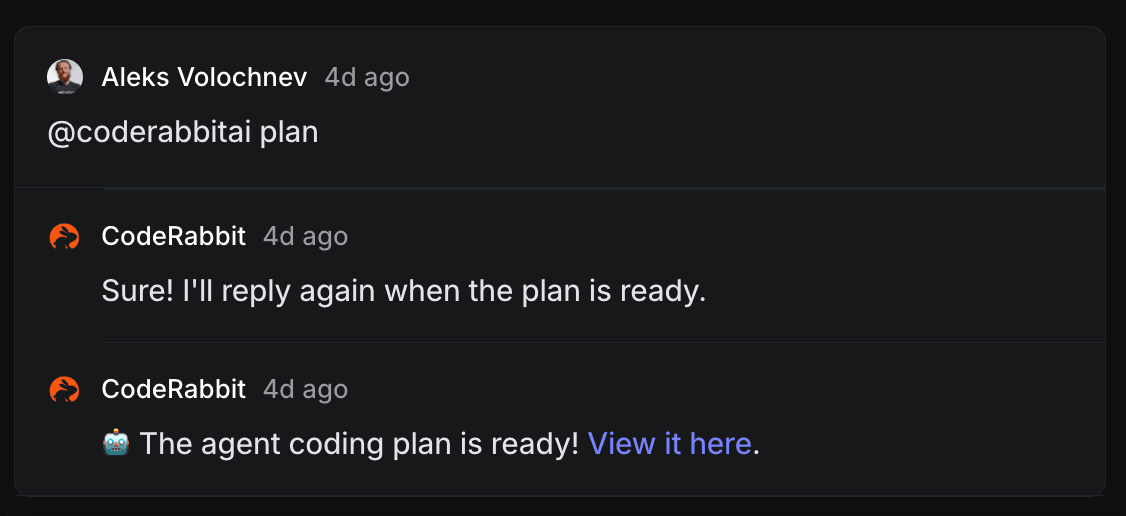
My planning process: one comment, one coffee, one plan.
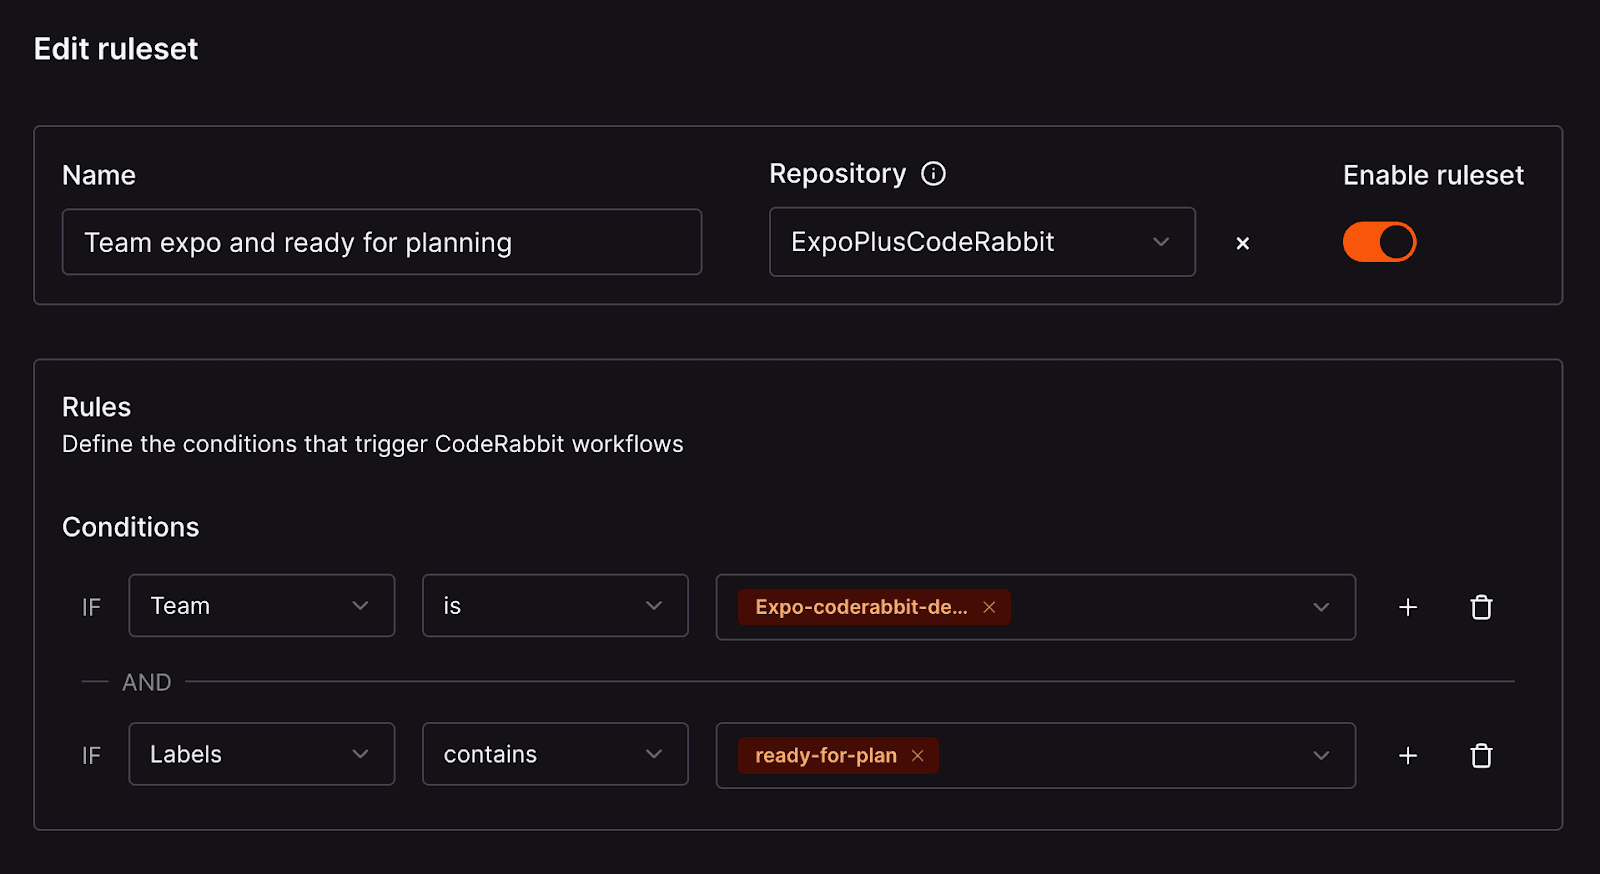
But the real power comes from Auto-Planning. In the CodeRabbit web app, get to the Plans tab and set up rules that automatically trigger planning when issues match certain conditions. You can filter by issue type, labels, assignee, or status, and combine them however you like. For example: "Plan every bug assigned to me that moves to In Progress." Set it up once, and every time you pick up a ticket, the plan is already waiting for you.
One more thing: since Linear issues aren't tied to a specific repository, CodeRabbit needs to figure out which codebase to analyze. It can usually detect this on its own, but the most reliable approach is to specify the repository directly in your planning rule. No guessing, no extra comments.
IF (ready-for-plan) THEN (rabbit does the planning) ELSE (you do the planning at 2am)
The plan lives in the CodeRabbit web app. Click the link in CodeRabbit's comment on the issue to open it. Here's what you'll find:
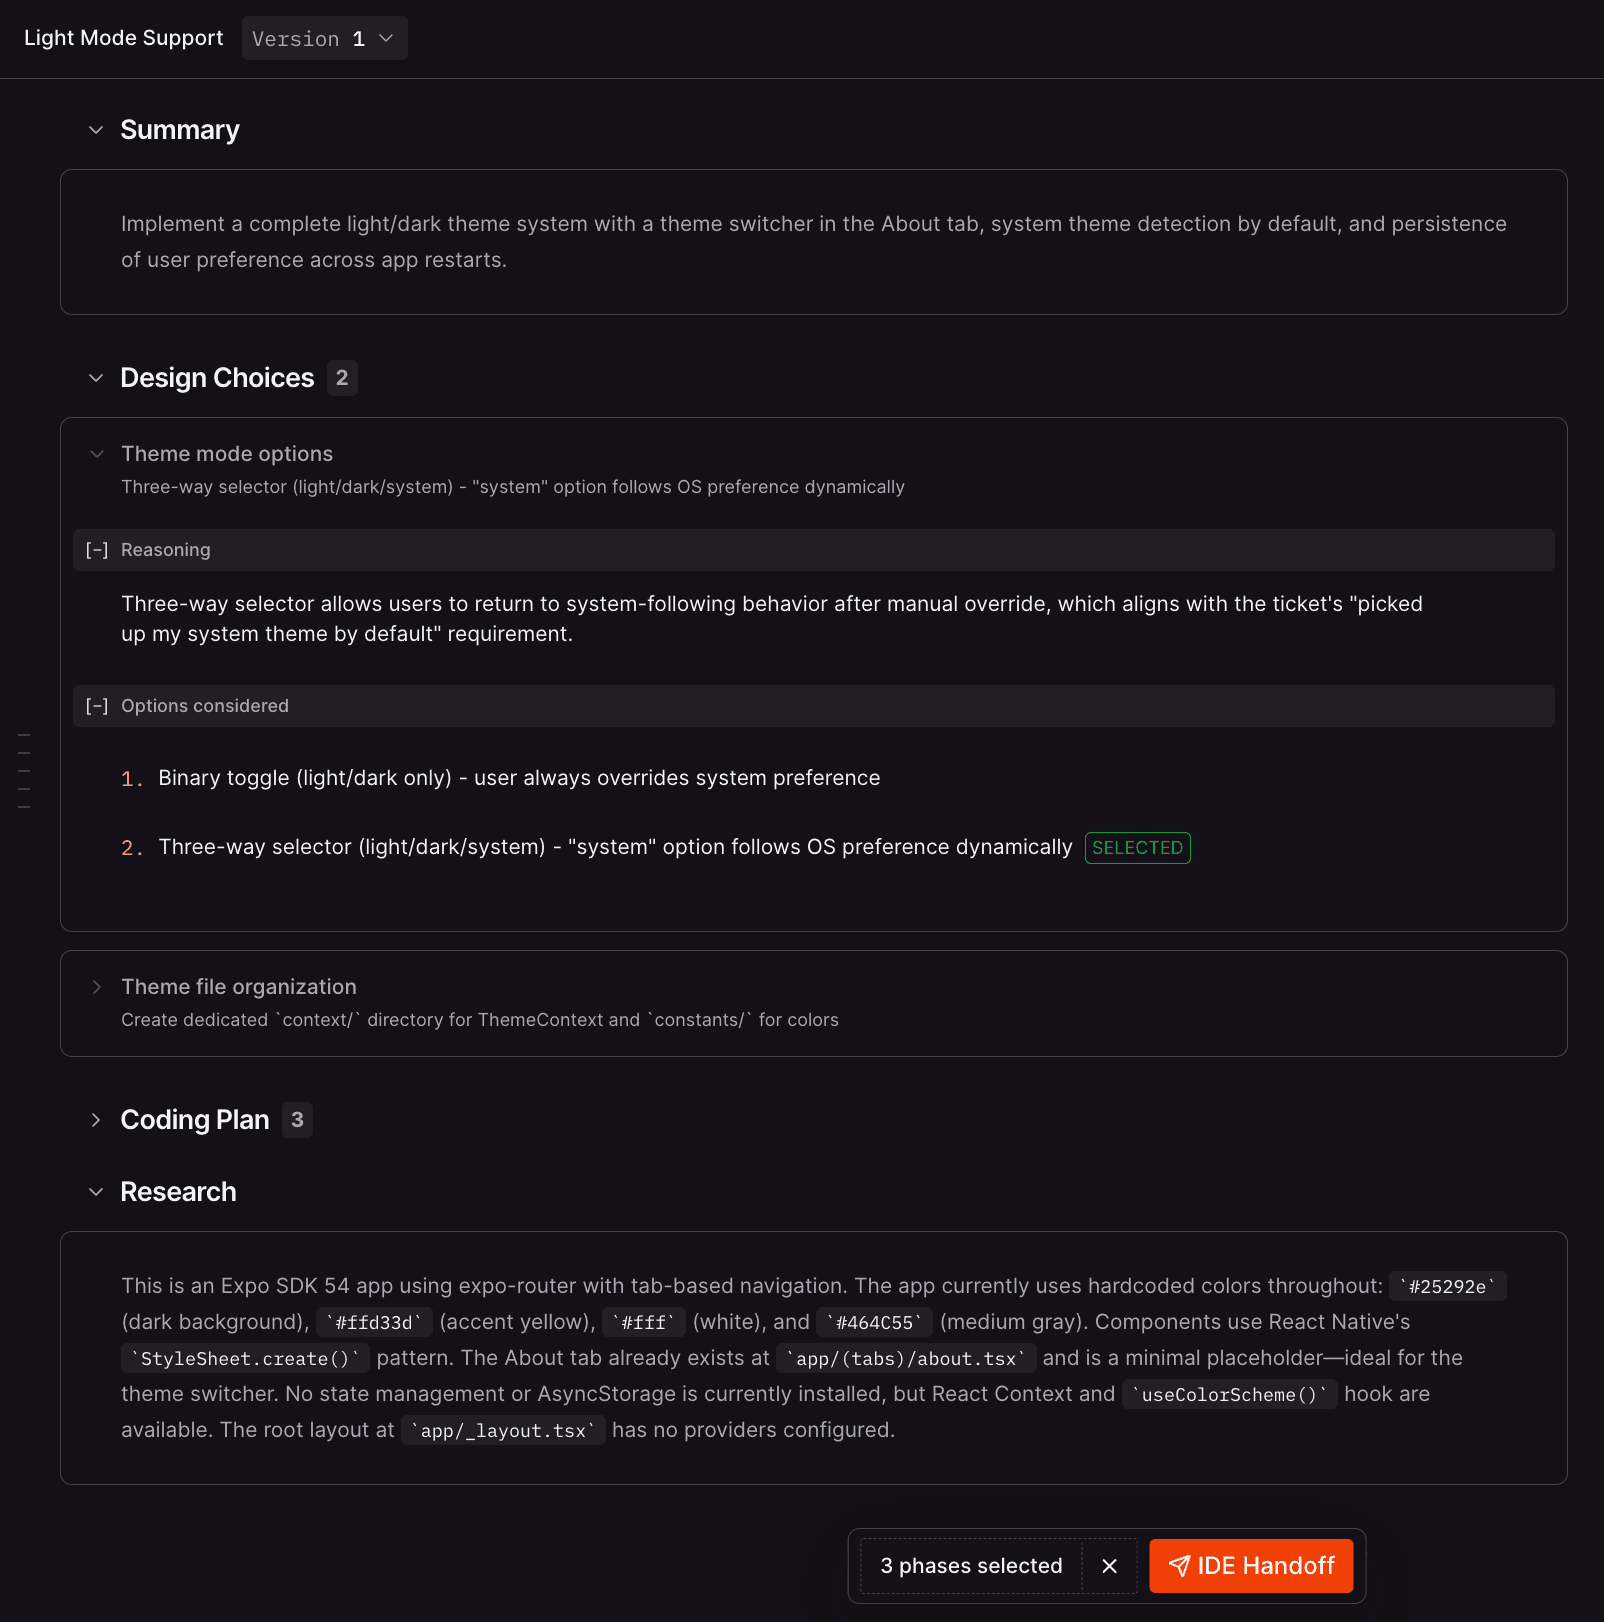
A concise overview of the implementation approach, tailored to your architecture and conventions.
Deep codebase analysis: relevant files, existing patterns, dependencies, and architectural decisions that affect this work. This is the context you'd otherwise spend an hour gathering manually (or that your coding agent would skip entirely).
For each significant decision, you get the concern, the options that were considered, and which option was chosen, along with the rationale. "Three-way selector (light/dark/system)" instead of a simple toggle? Here's why. Creating a dedicated themes/ directory for the visuals? Here's the reasoning. These are the decisions worth reviewing with your team before anyone writes a line of code.
‘The hour of reading code before writing code’ part, done for you
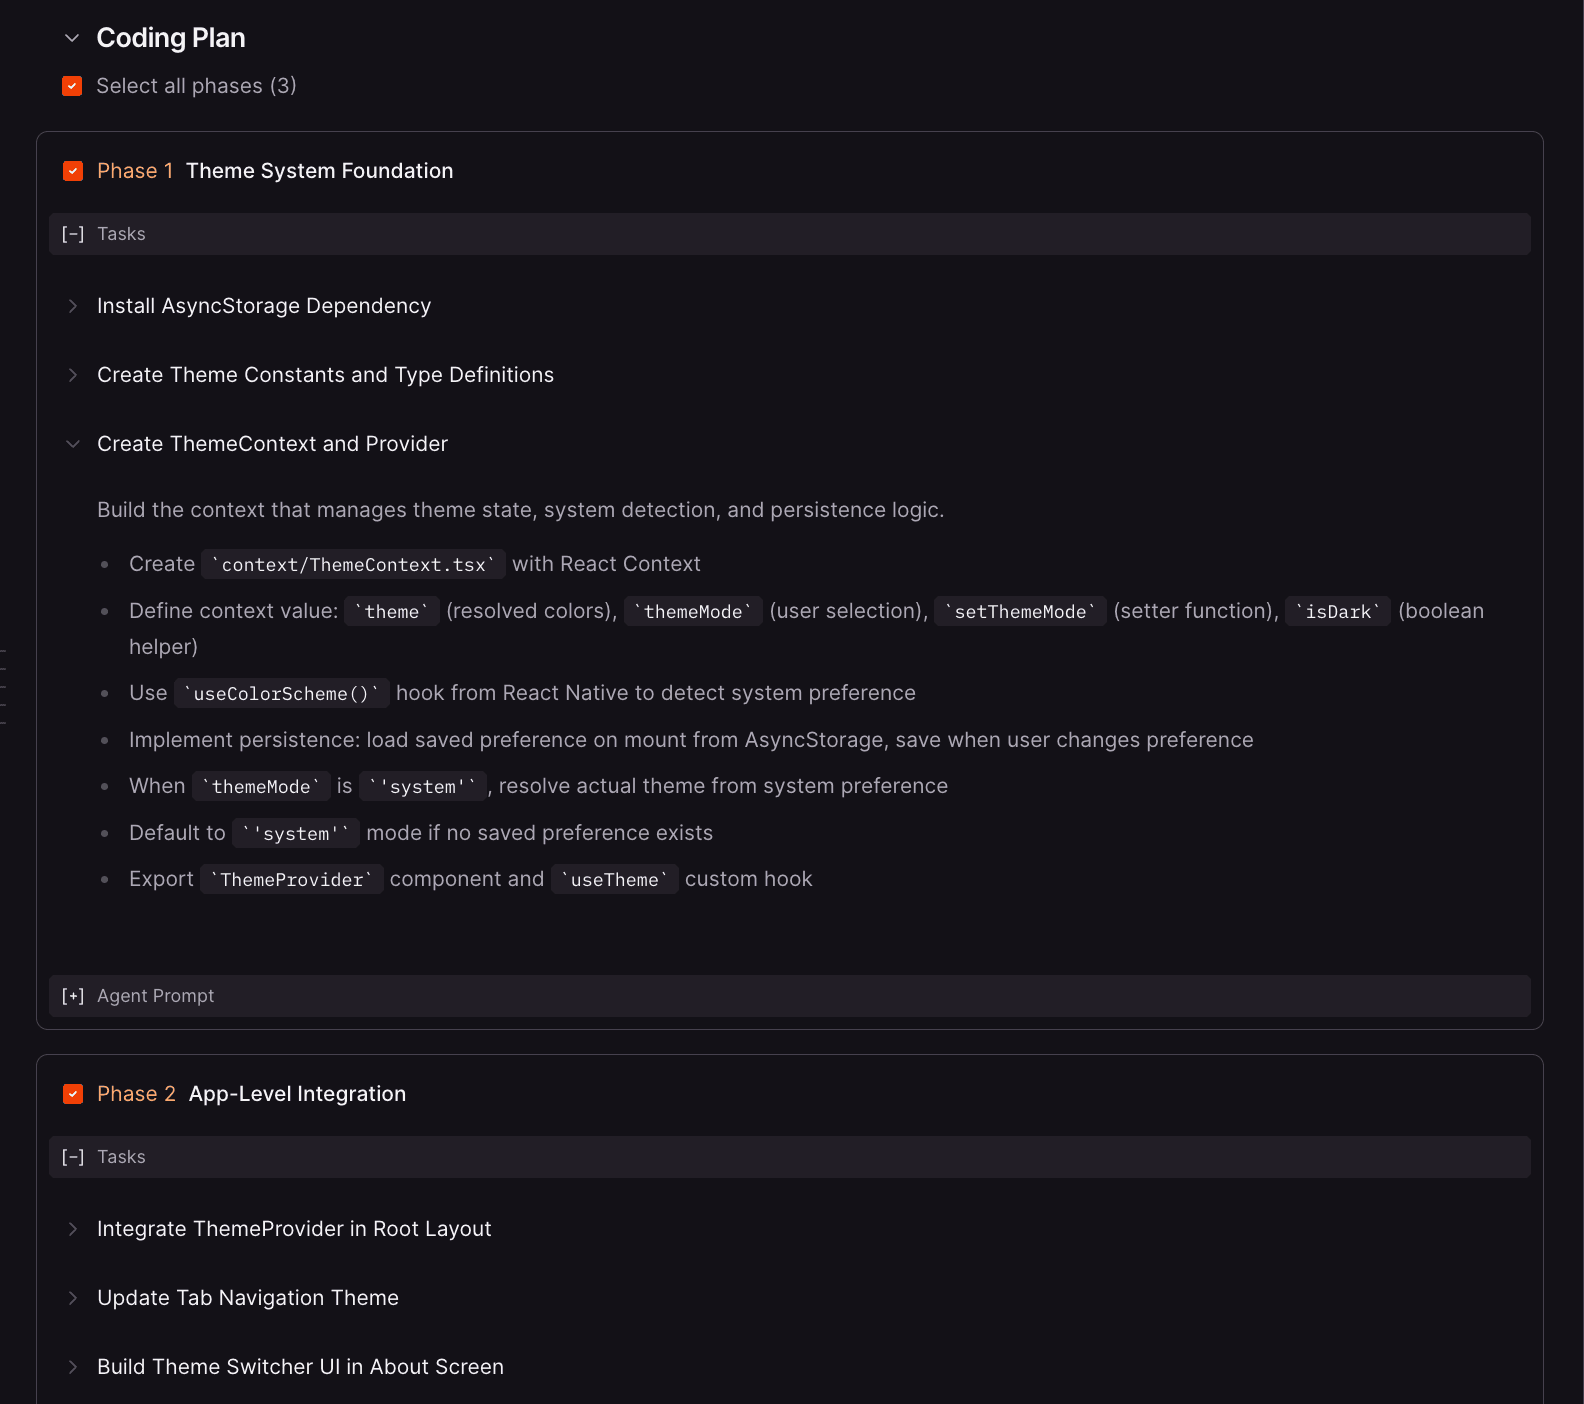
The implementation broken into logical, shippable chunks. Each phase groups related changes that make sense to build and test together. Phase 1 might lay the foundation (AsyncStorage and ThemeProvider).Phase 2 integrates it at the app level. Phase 3 migrates existing components.
Your agent's favorite kind of prompt: the very specific one.
Machine-readable instructions for your coding agent, available per phase or as a combined prompt. Not the vague suggestions, but real, applicable instructions. They reference specific files, follow your project's patterns, and include the edge cases your agent should handle.
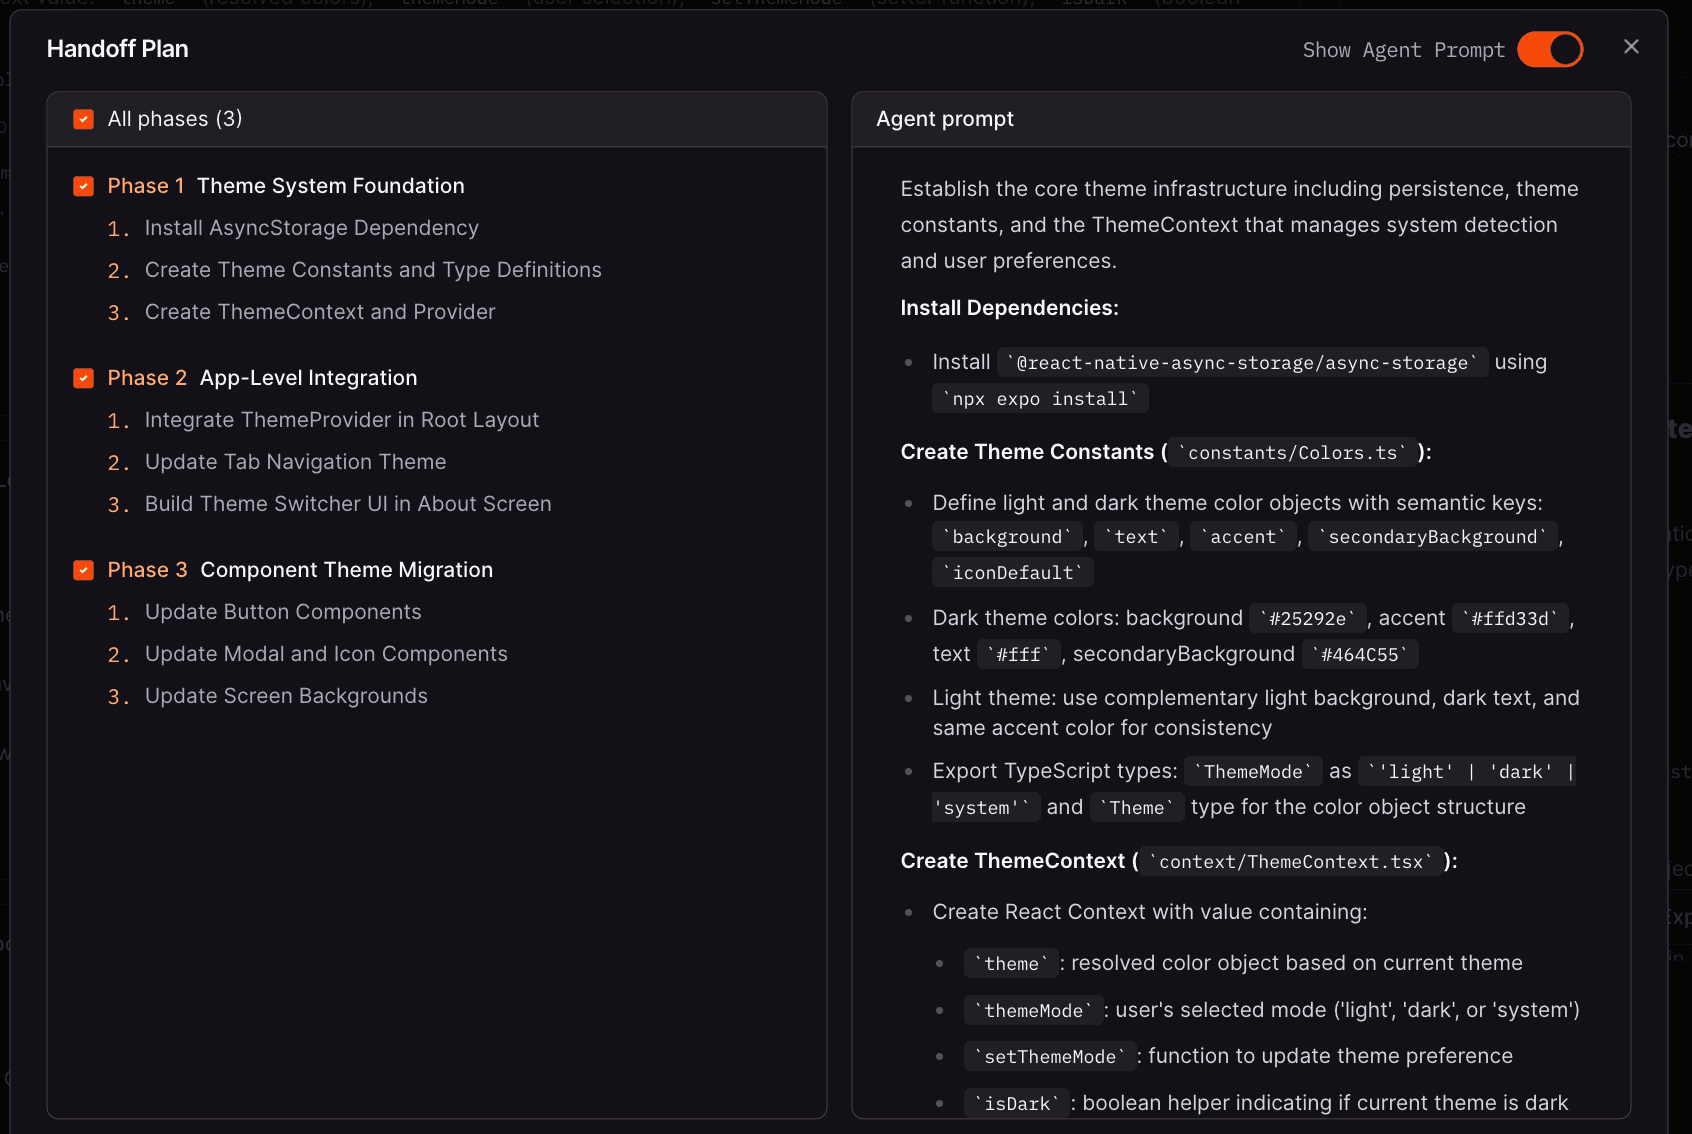
Specific file paths, actual type definitions: no more “can I haz dark mode pls?”
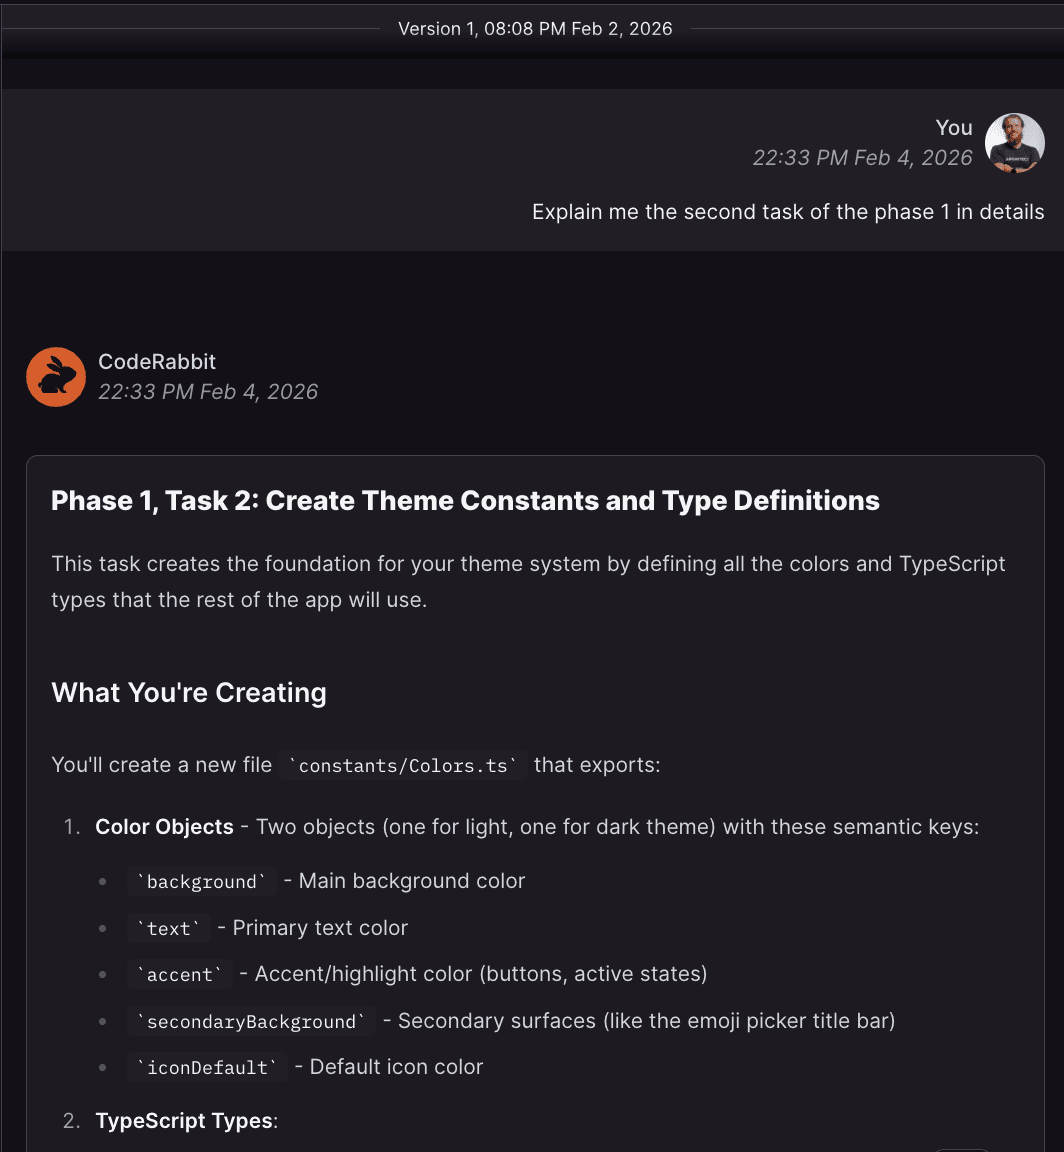
The plan editor has a chat panel on the right side. Use it to ask questions about the plan, challenge design choices, or request changes. Don't like that the plan chose option 2 for a design decision? Tell CodeRabbit you'd prefer option 3, and explain why. Want more detail on a specific step? Just ask.
When you're happy with the feedback you've given, hit Redo Plan. CodeRabbit regenerates the plan incorporating your notes. Every version is preserved, so if a re-plan goes sideways, you can roll back to a previous version.
For smaller issues, your own knowledge might be enough. For anything non-trivial, I'd encourage sharing the plan with your team. Send the link to your colleagues and let them poke holes in it. A Product Owner reviewing the plan before implementation starts can save everyone a painful "that's not what I meant" moment a week later. Plans are collaborative by design: anyone in your organization can view them, chat about them, and trigger re-plans.
Rubber ducking except the duck answers back
Once you're satisfied with the plan, select the phases you want to work on and click IDE Handoff. If you have the CodeRabbit IDE extension installed (VS Code, Cursor, Windsurf, or any compatible editor), the agentic prompts land directly in your coding agent's input field, ready to execute. Pick your IDE from the dropdown and go.
No IDE extension? Hit Copy prompt to grab the prompts as text and paste them into Claude Code, GitHub Copilot, or whatever tool you prefer. Same prompts, same quality, just a manual paste.
![Three down, your favorite is [probably] next.](https://victorious-bubble-f69a016683.media.strapiapp.com/2a22c1a980b2e0b0d150955dbf4069bd729c41c3ffdee694ed282e4493212ccc_16a361eb2e.png)
Three down, your favorite is [probably] next.
If you're new to CodeRabbit, start by installing it on your repositories (GitHub, GitLab, Bitbucket, or Azure DevOps are all supported). The quickstart guide walks you through the setup in under five minutes.
Already using CodeRabbit for code reviews? You're halfway there. Head to the CodeRabbit dashboard, go to Integrations, and connect your Linear workspace. This unlocks Issue Planner, but it's also worth doing for code review. CodeRabbit will validate your pull requests against the acceptance criteria in linked Linear issues, catching gaps that people often miss.
Once Linear is connected, comment @coderabbitai plan on any issue. Your first Coding Plan will be ready in a few minutes. From there, set up Auto-Planning rules so plans are waiting for you before you even open the ticket.
Linear handles the what and when. CodeRabbit Issue Planner now handles the how. Unlike asking your coding agent for a quick plan, you get one that's actually grounded in your codebase, informed by related issues, and reviewed by your team before a single line of code is written.
CodeRabbit is free for open-source projects and comes with a free trial for private repositories. Give it a spin on a real issue and see how the plan compares to what you'd get from your agent alone.
Learn more and try Issue Planner today.